


West Coast Online
MacTCP and MacPPP Setup
Step 1: Check File Locations.
Before we begin, verify that the files MacTCP and ConfigPPP are located in
your Control Panels folder. The file called PPP should be in your
Extensions folder located in the System Folder.
Step 2: Selecting PPP from MacTCP.
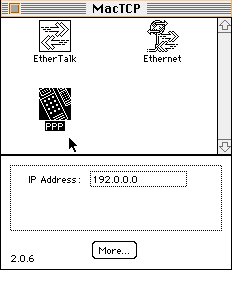 Locate your MacTCP in your Control Panels and
double click on it. Yous should see a screen like the one on the left.
If your ConfigPPP is in the right place then you should be able to select
PPP in the upper window. Once it is highlighted, click the More button at
the bottom of the window. Locate your MacTCP in your Control Panels and
double click on it. Yous should see a screen like the one on the left.
If your ConfigPPP is in the right place then you should be able to select
PPP in the upper window. Once it is highlighted, click the More button at
the bottom of the window.
If PPP is not an available choice and you know that it is installed on
your system, then you will must make sure that it is in the Control
Panels. Try doing a File - Find search for "PPP" from the desktop to find
the locations of any copies of ConfigPPP.
|
Step 3: Configure MacTCP.
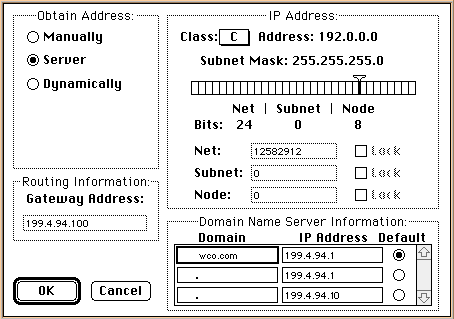
After clicking More, a window should appear that looks like the one below.
Change the settings in your window so that they match these.
If
you're having trouble changing the Gateway Address, try selecting Manually
in the Obtain Address section. When you have the proper number entered
into the Gateway, change the Obtain Address selection back to Server.
|
Step 4: Locate and Begin Configuration of ConfigPPP.
 Once MacTCP is set up, it's time configure
MacPPP. Unlike MacTCP, MacPPP is freeware. You can download it from the
WCO FTP site. There are several variations on MacPPP, such as versions for
very high -speed lines. Most should use the standard 2.01 version. The
information here should work for most version once you get past the
cosmetic differences. Once MacTCP is set up, it's time configure
MacPPP. Unlike MacTCP, MacPPP is freeware. You can download it from the
WCO FTP site. There are several variations on MacPPP, such as versions for
very high -speed lines. Most should use the standard 2.01 version. The
information here should work for most version once you get past the
cosmetic differences.
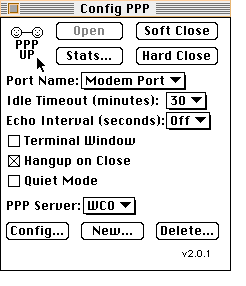
Once ConfigPPP is loaded it should display a screen that looks similar to
the one on the left. Don't worry just yet about making your screen look
exactly like ours. Click on the New button at the bottom of the
window.
|
Step 5: The ConfigPPP Modem Screen.
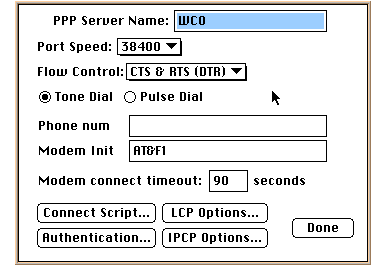 Change your screen to look like the one on the
right. Consult the WCO Phone Number
List for the local number to enter in the Phone number section.
Don't forget to enter the phone number!. ConfigPPP won't function
without it. Change your screen to look like the one on the
right. Consult the WCO Phone Number
List for the local number to enter in the Phone number section.
Don't forget to enter the phone number!. ConfigPPP won't function
without it.
Once you are finished here, click on the Connect Script button at the
bottom of the screen.
|
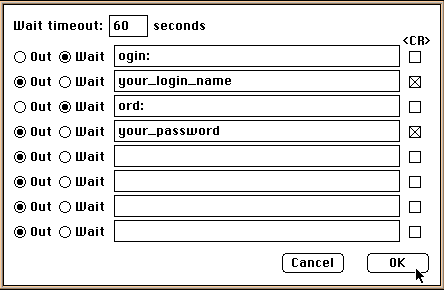
Step 6: Entering the Connection Script.
Make your Connection Script screen look like this one, except
replace "your_login_name" with your login name, in all lower
case, that was provided to you when your account was created. Also
replace "your_password" with the password you requested on the
signup sheet. Click on OK when your are finished.
|
Step 7: Authentication Screen
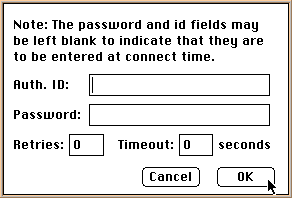 You will now find yourself back at the ConfigPPP
Modem Screen. Click on the Authentication button at the bottom of the
screen. You will now find yourself back at the ConfigPPP
Modem Screen. Click on the Authentication button at the bottom of the
screen.
You need to make sure that the Auth. ID and Password
fields in this screen are left blank. Click OK when you're done.
|
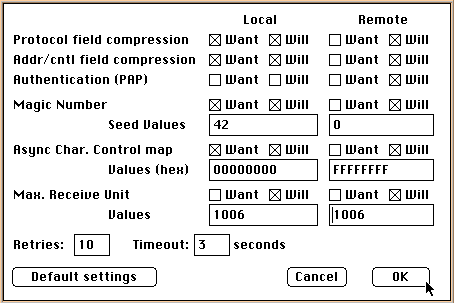
Step 8: Check LCP Options
Click on the LCP Options button to bring up the screen below. Again, make
your settings look like these. If you notice that your connection is
slower than you think it should be, try changing both Max Receive Unit
settings to a lower number (296 is a go od start). Under normal
circumstances, these settings should not be changed from the ones below.
Click on OK when you are done.
|
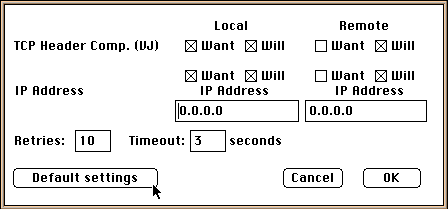
Step 9: Check ICP Options
Click on ICP Options at the bottom of the ConfigPPP Modem Screen to bring
up the window below. Change your settings to look like ours. Take
special care to assure the the IP Address are set to 0.0.0.0 and
not 1.1.1.1. When you're finished click on OK.
|
Step 10: Finishing Up
When you're done with the four buttons at the bottom of the Modem Screen,
click on Done to return to the starting ConfigPPP screen. It's a good
idea at this point to close ConfigPPP and restart your Mac so all the
changes you've made can take effect. When en you're ready to connect to
West Coast Online, launch ConfigPPP and click on the Open button. Once
the connection has been established, you can run any Internet application
such as Netscape or Eudora. Happy surfing!
|


