


West Coast Online
Windows NT 4.0 Setup
Introduction.
There are basically two parts to configure Windows NT to connect with West Coast Online. First, you need to install or configure RAS from the Network Control Panel. Second, you need to create a RAS Phonebook Entry for West Coast Online. To keep load time tolerable, these two parts divided into a Control Panel Section (this page) and a Dial-Up Networking Section.
Section 1
Control Panel
Step 1: Locate the Network Control Panel
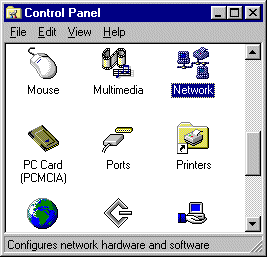 To begin, go into your Control Panel either by double clicking on Control Panel in My Computer or through the Start button. In the Control Panel, locate the Network icon. Double click the icon to open to the Network Control Panel.
|
Step 2: Add Remote Access Service
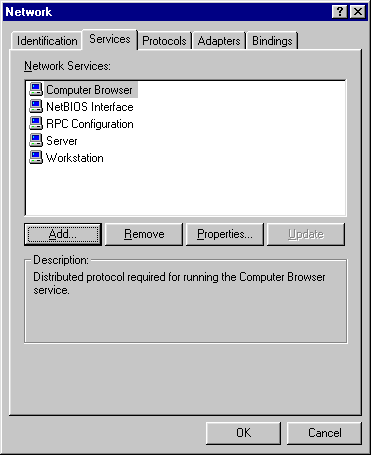 On the first screen of the Network Control Panel click on the Services tab near the top of the window. Now check to make sure that the Remote Access Service is not in the list of Network Services. If it is listed, click on the Remote Access Service entry then click the Properties button and skip to Step 5. If Remote Access Service is not listed, then click on the Add button and continue with the next step.
|
Step 3: Select Remote Access Service.
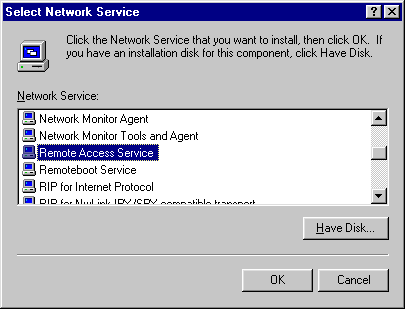
In the Select Network Services window, scroll through the list and locate the entry for Remote Access Service. Click on it, and click OK.
|
Step 4: Add Your Modem to RAS.
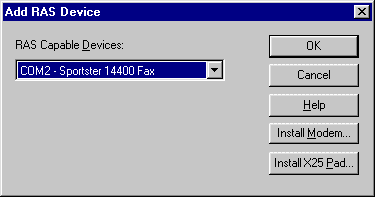 After NT copies some files, you should be prompted with the Add RAS Device window. All you need to do in this window is select which modem you wish to dial into West Coast Online with. In the dropdown box below the heading RAS Capable Devices, select your modem then click OK to continue. From this point forward, our examples will show the configuration of a fictitious USR Sportster. Your modem will probably be different, but the steps are the same.
|
Step 5: Setting Up RAS With Your Modem.
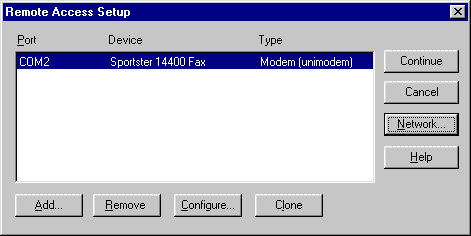
In the Remote Access Setup window, you need to select the modem you plan to use in the list. Here you need to click on two buttons before you're done. First click on Configure in the lower button group.
|
Step 6: The Configure Port Usage Window
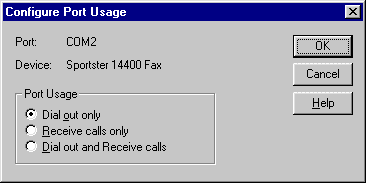 For most users, setting the Port Usage setting to Dial out only will be sufficient. Click on OK to return to the window in Step 5. Click on the Network button to move to the next step.
|
Step 7: The Network Configuration Window
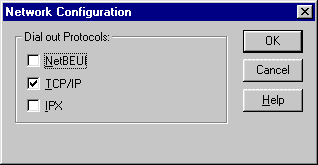 The Network Configuration window controls what network protocols are sent through your modem. When connecting with West Coast Online, you only need to check TCP/IP. Click on OK to return to the window in Step 5 where you should click Continue.
|
Step 8: Restart
You should now be prompted to restart your computer, which you should do. When it comes back up, you're ready to begin Section 2.
|
Go to Section 2

